
How to Make Traditional Dundun Stands
DIY dundun stands: strong, practical, and cheap
If you want to play your dunduns traditionally, on their side, you will need stands for them. The stands shown in this article are easy to make and cheap: total cost of materials is about $100, and you can easily complete the project in a weekend. The stands are very strong and stable, so they can cope with even the heaviest dunduns and, when folded up, they nest inside each other so they don't take up a lot of room when not in use and during transport.
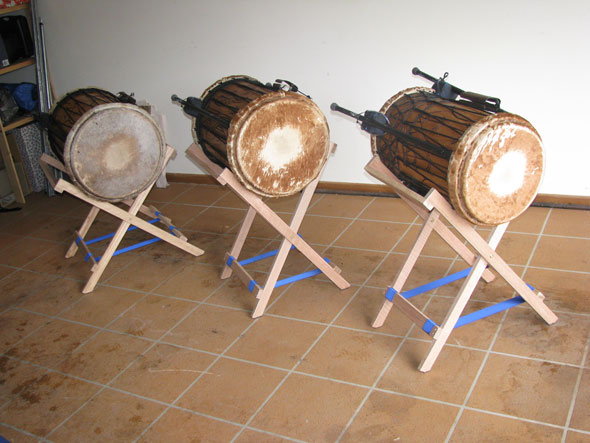
Image 1: Completed stands with dundun
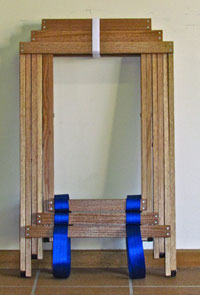
Image 2: Stands nested inside each
other for storage or transport
Materials
Let's take a look at what you're going to need for this project.
- 42x19mm hardwood strip flooring, 15 lineal meters (4 lengths of 8ft, 3 lengths of 6ft)
- 6 connector bolts with M6 thread
- 48 30mm 6G wood screws with Phillips counter-sunk head
- 4.5m of 50mm webbing (seat belt webbing or webbing from a cargo strap)
- 36 10mm wood screws with Phillips round head
- 36 flat washers to fit the 10mm wood screws or 12 pieces of 3x16mm aluminium flat bar, 4.5cm in length
- 24 10mm wood screws with Phillips counter-sunk head
- Loctite
- 6mm black Neoprene rubber
- Single-pack polyurethane lacquer
- Sandpaper, coarse and fine
- Wood glue
- Construction glue
For the timber, be sure to use hardwood, otherwise the stands will flex too much. If you cannot find timber with the exact measurements given here, choose something of similar dimensions, but not less than 18mm in thickness. (For timber with thickness other than 19mm, you will have to adjust the 8.5cm step-down in width of the stands—see Measurements below.)
Tools
You can easily build the stands using only hand tools and an electric drill. To cut the timber, use a quality cross-cutting saw and a mitre box. (It is very difficult to cut at exact right angles without a mitre box, which you can get for around $10.)
If you have an electric mitre saw or a drill press, these tools will make the job a little easier, but they are by no means essential.
- Hand saw and mitre box, or mitre saw
- Electric drill
- 2mm, 2.5mm, 6mm, and 8mm HSS drill bits
- Countersink bit
- Wood clamp
- Scissors
- Blow torch or cigarette lighter
- Orbital sander (or sanding block and elbow grease)
Measurements
To work out the width of the stands, start with the dundunba and measure the distance between the two flesh rings. Subtract 2cm from that to get the overall width of the dundunba stand. For example, if the flesh rings on the dundunba are 56cm apart, the dundunba stand should be 54cm wide (or possibly a little less, depending on your preference).
For the stands to nest inside each other, the sangban stand must be 8.5cm narrower than the dundunba stand, and the kenkeni stand must be 8.5cm narrower than the sangban stand. So, for the preceding example, the three stands will be 54cm, 45.5cm, and 37cm wide. Make sure that you can get reasonable support for your dunduns given these constraints.
Figures 1 and 2 show the measurements for the stands I built for this article. Obviously, you will need to adjust the measurements to suit your dunduns. (Measurements shown are in cm; divide by 2.54 to get measurements in inches.)
Figure 1: Opened stands, side view
Download this diagram in PDFFigure 2: Closed stands, front view
Download this diagram as a PDFTo figure out the correct angles and lengths, you can use a CAD package, such as DraftSight, but beware that CAD packages have a steep learning curve. (To find the diameter of the dunduns where they are supported by the stands, measure the circumference of each drum with a tailor's measuring tape where the verticals are and divide by 3.14.) I used a CAD package mainly so I could create the preceding diagrams; realistically, it is much easier to just eyeball the correct dimensions.
To do this, put the dundunba upright on the floor and mark the center of the skin on the floor beside it. Take two of the lengths of timber and position them on the floor the way they will eventually support the drum, crossing over "below" the drum. Adjust the position of the legs so you get a good angle to support the drum. The bottom of the legs should be far enough apart to get good support.
Measure in a plumb line perpendicular to the drum (vertically down, if the drum were in its eventual position on the stand) to determine the height of the stand. The correct playing height is around 68–72cm from the floor to the centre of the of the playing surface. (Work out what height you want beforehand by putting the drums on some temporary support and find the height that works for you.) Ensure that, with the angle you have set the legs at, you will get the desired playing height and that the opening angle results in a base for the stand that is wide enough to properly support the drum. (The stand should have approximately the same width at the bottom as at the top, or be a little bit wider at the bottom than the top.) Mark the timber where the 72cm plumb line intersects with the timber.
Now measure along one of the legs from the top to where the two legs cross over, which is where you will place the hinge and note that distance. Repeat this process for the sangban and kenkeni. When you measure the timber for the legs, add 5cm or so to the actual length. We will trim off that excess length once the stands are assembled.
Video 1: Working out dimensions and angle
Preparing the Timber
Before you start assembly of the stands, I recommend to round off all the edges with coarse sandpaper. Without this, it is easy to cut yourself on the edges when you handle the finished stands, and it is also a lot easier to do this now, before assembly, than it is to do once the stands are completed.
Video 2: Breaking the edges
It is also a good idea to lightly sand all the surfaces of the timber, to remove any splinters and to create a good finish for painting.
Video 3: Sanding timber surfaces
Cutting the Timber
Use a cross-cutting saw and a mitre box or an electric mitre saw to cut the legs for each stand (leaving 5cm extra).
Video 4: Cutting with a mitre box
If you use an electric saw, please remember to wear eye protection. It is easy to get sawdust or splinters into your eyes otherwise, possibly causing permanent damage to your eyes.
Video 5: Cutting with an electric mire saw
Fitting the Hinges
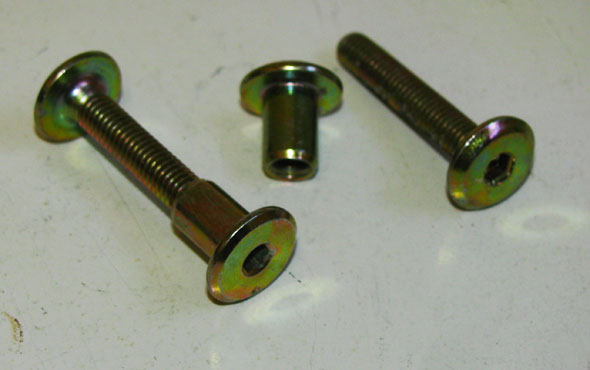
Image 3: Connector bolts
As hinges, you can use connector bolts. These are normally used by cabinet makers to clamp adjacent cupboard walls together, but they make for an excellent hinge for our purposes because the heads of the bolts are flat and do not add much to the width of each pair of legs. You can find connector bolts at places that sell furniture hardware.

Image 4: Flat wood drill bit
Ideally, the space between the bolts when they are fully tightened should be 0.5–1.0mm wider than the width of a pair of legs (around 39mm in this case). You will probably not be able to get the bolts in exactly the right length. You can buy bolts that are longer and cut them to the correct length with a hacksaw or an angle grinder. If the bolts are marginally shorter (as was the case for this article), you can use a flat wood drill bit to make a recess that accommodates the head of the connector bolts.
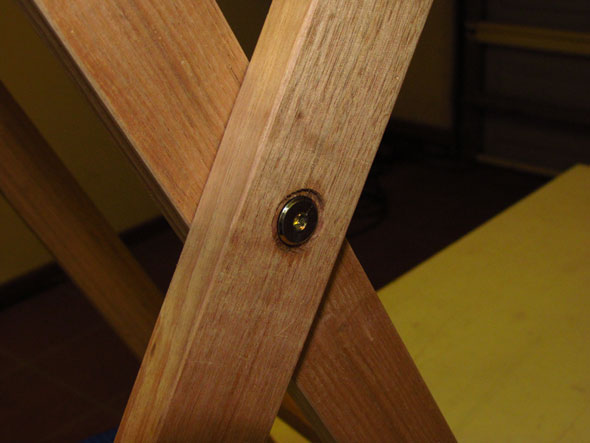
Image 5: Completed hinge
To make a hinge, clamp two of the legs together with a wood clamp and drill a 6mm hole through the centre, at the distance from the top you measured previously. Widen the hole on one side to 8mm to accommodate the wider part of the connector bolt. Do the same with the other pair of legs and connect the two pairs with the connector bolts. Use a drop of Loctite on the connector bolts to stop them from coming loose over time.
Video 6: Fitting the hinges
Assembling the Dundunba Stand
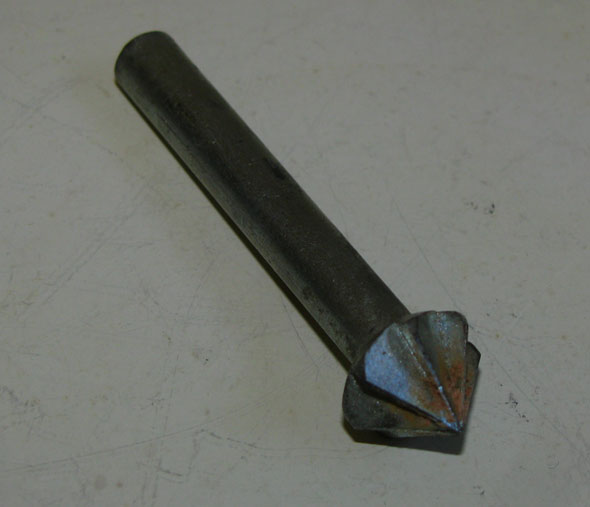
Image 6: Countersink bit
With the two pairs of legs connected by their hinge, set the two pairs parallel and connect the two outer ones at the top with a 54cm cross piece and the two inner ones at the bottom with a 50cm cross piece. Use two 30mm wood screws to connect each cross piece to the legs. Drill pilot holes for the screws and use a countersink bit so the heads of the screws will sit flush with the surface of the timber.
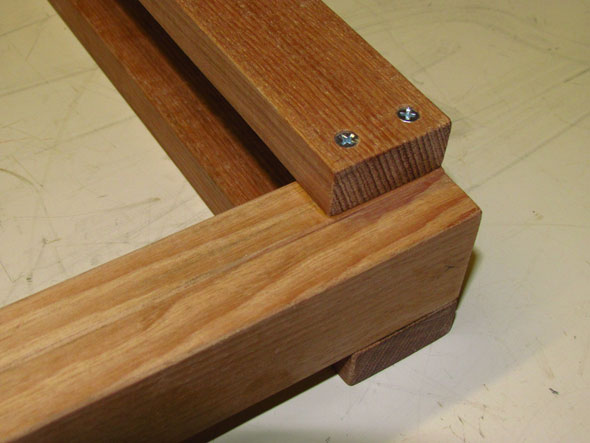
Image 7: Inside top cross piece
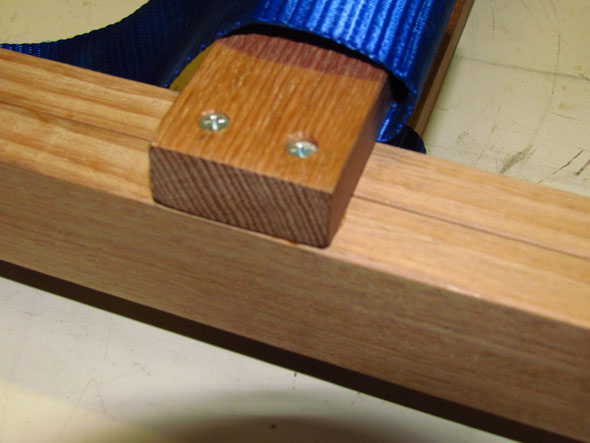
Image 8: Outside bottom cross piece
It is important to use wood glue on each join. Without glue, the joins will flex and the stand will quickly lose its stability as you play it, becoming increasingly loose over time.
Turn the stand over and connect the inner two legs at the top with a 50cm cross piece and at the bottom with a 54cm cross piece. This results in a stand where, on one side, the outer legs are connected at the top and the inner legs are connected at the bottom; on the opposite side, it's the other way around: the inner legs are connected at the top and the outer legs are connected at the bottom.
Video 7: Assembling the dundunba stand
Assembling the Sangban and Kenkeni Stands
The basic dundunba stand is now done, except for the webbing and finishing. To build the sangban stand, slide the legs for the stand inside the dundunba stand, leaving a small (2–3mm) gap between the adjacent pairs of legs and measure the distances for the cross pieces, effectively building the sangban stand inside the dundunba stand.
Video 8: Assembling the sangban stand
Remember to leave a 3–4mm gap between the bottom cross pieces. This gap allows the straps to emerge between the cross pieces when the stands are folded up inside each
other.
Once you have completed the sangban stand, you repeat the process for the kenkeni stand, again leaving a small gap between adjacent legs and the bottom cross pieces.
Video 9: Assembling the kenkeni stand
Attaching the Straps
The basic stands are now done. Take some webbing and cover the last 4cm on one side with glue. Fold the end over so you get a double-thickness strip about 2cm wide, held together by the glue. The double layer of fabric provides extra strength and prevents the webbing from tearing over time. Once the glue has set, heat a piece of fencing wire or similar and melt three holes through the double-thickness strip of webbing. You have to make these holes first: trying to drill through the webbing does not work because threads in the webbing will wrap around the drill bit and make a complete mess.
Video 10: Preparing the straps
To attach the webbing to the cross pieces, you can use three 10mm round head screws with a large flat washer to distribute the pressure, as shown in Image 9.
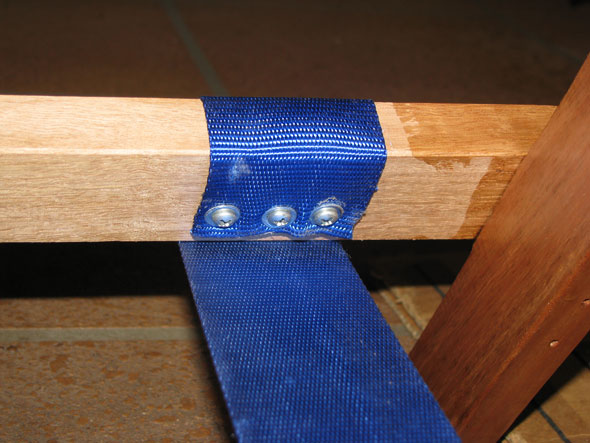
Image 9: Attachment with three screws and washers
For this article, I used 3x16mm aluminium flat bar, cut into lengths a little shorter than the width of the strap, with three holes in each length. The flat bar forms a plate that presses the webbing against the cross piece once you tighten the screws, evenly distributing the pressure over the entire width of the webbing.
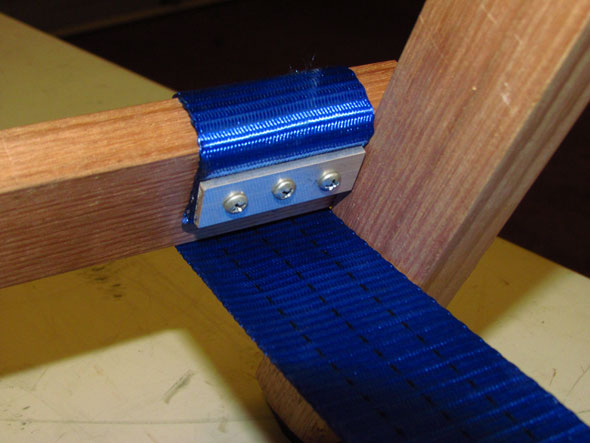
Image 10: Image 10: Attachment with flat bar
Attach the straps to the kenkeni stand first. On the narrower pair of legs, attach the straps to the cross piece so they butt up against the side of the leg. On the wider pair of legs, attach the straps 20mm away from the inside of the leg. This ensures that the straps are at right angles to the cross pieces; the 20mm gap accommodates the inner pair of legs when the stand is closed.
To find the correct opening angle for the stand and to set the height correctly, attach one of the straps to the bottom cross piece, set the stand upright, and temporarily clamp the other end of the strap to the opposite cross piece with a wood clamp. You can now place the kenkeni on top of the stand and adjust the opening angle to get the right height and width. (Remember that the legs are still a little too long at this point and allow for that.)
Once you have found the correct height and width, mark the strap at the end where it is clamped and cut it to the right length. (Add an extra 2cm for the strip where the fabric is folded over.) Use the first strap as a template to make a second strap of the same length and attach both straps to the stand.
Video 11: Setting height and opening angle
Once you have both straps attached, mark a horizontal line on each leg such that the center of the drum ends up at the correct height and trim off the excess length of the legs. Doing this leaves an acute angle at the end of the leg pointing towards the floor when the stands a folded up. Trim off about 1cm of that tip to create a surface on which the stands can rest when they are folded up.
Video 12: Trimming the legs
For the sangban and the dundunba stand, you need to attach the straps at the same distance as for the kenkeni stand so the straps don't get in the way when the stands are nested inside each other. Measure the distance of the straps on the kenkeni stand and attach the straps for the sangban and dundunba stand at that same distance, centered on the cross piece.
Video 13: Attaching straps for the sangban and dundunba stand
Attaching Rubber Feet
It's a good idea to add rubber feet the stands. This prevents them from sliding on slippery floors and also prevents leaving scratch marks on wooden floors. You can use 6mm Neoprene rubber mat to cut the feet out of. Trim off any excess rubber along the plane of the bottom and side of the leg, as shown in the image.
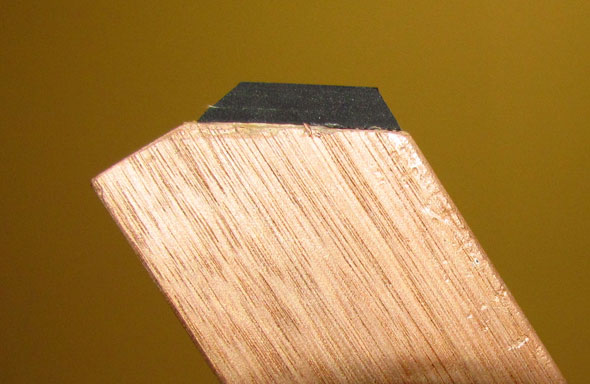
Image 11: Rubber foot
You may also be able to find suitable self-adhesive rubber feet at a hardware store. However, I would not rely on adhesive alone because it is unlikely to last long. Instead, additionally secure each of the rubber feet with two small screws. Drive the screws in far enough for the screw heads to recess into the rubber, to avoid having the screw heads leave scratch marks on the floor.
Video 14: Attaching rubber feet
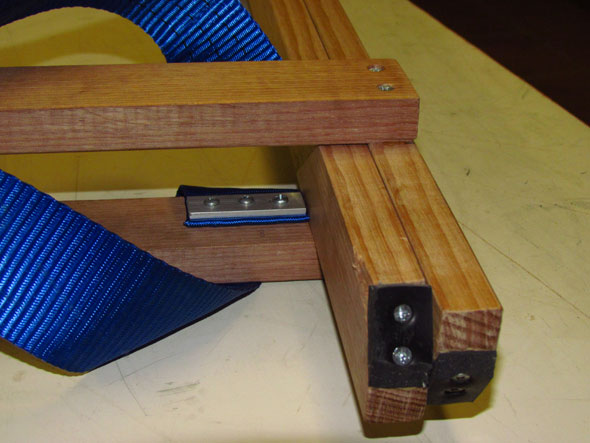
Image 12: Detail of cross piece, strap attachment, and rubber feet
Painting
It is a good idea to paint the stands. Without this, the raw wood quickly accumulates dirt and starts to look grubby. Once painted, dirt and handling marks will not adhere as much to the stands. Paint also helps to seal the wood against moisture and allows you to wipe the stands down if they get dirty.
I prefer to use clear single-pack polyurethane lacquer, but you can of course choose whatever color scheme you prefer. (A red, yellow, and green color scheme can look good, especially if your dunduns also use these colors.) If you use a clear lacquer, remove any pencil and handling marks before painting, so you get a nice finish.
I find it easiest to paint all of the stands except for the bottom cross pieces. Once the initial coat of paint has dried, I turn the stands upside down, move the straps so they hang over the side, and then paint the bottom cross pieces.
Video 15: Painting
Nesting the Stands for Storage or Transport
Once the paint has dried, you are ready to enjoy your new dundun stands. To pack them away, fold up the kenkeni stand, slide it inside the sangban stand, and close the sangban stand around it. Then lift both folded stands up and slide them into the dundunba stand, closing the dundunba stand. You end up with a nice flat package that takes up little room. To prevent the stands from sliding apart during transport, you can use a length of Velcro tape around the top cross pieces to hold them together.
Video 16: Nesting the stands
I hope you'll have fun building these stands and, more importantly, using them! They are very sturdy, and chances are that the stands will outlive you and end up being used by your future dununfola grandchildren!
I would like to thank my wife Jocelyn for her help with this article. She shot all the video and managed to do it with a still camera that couldn't even zoom during a shot! It is due to Jocelyn's skills that you can see what is going on with such clarity.
Michi Henning is a djembe player and teacher in Brisbane, Australia. He is a frequent contributor to djembefola.com. He got bitten by the djembe bug in early 2004 and, since then, has failed to get rid of it again. Consequently, he spends much of his life drumming, teaching, performing, building drums and drum stands, reading about drumming, listening to Malinke music, and generally obsessing about the djembe. In real life, when he isn't busy doing something djembe-related or planning his next trip to Africa, he is a computer scientist specializing in distributed computing.
Related Articles

michi says:
Hey Sahar, just saw your comment. Glad you found the instructions useful! I had a look you the images of your stands on your site. They look great! I love the red-yellow-green design on the cross pieces! :-)

Find out about our latest media first!
We release new articles all the time. Have them delivered to your mail box for free!
sahar.k says:
hello there :D Would like to share this with you. Thank you for sharing this tutorial, I appreciate everything you do and share in this website. i have wondered about making the dundun stands and i found your post earlier this year, and here are my results :D http://jebebarabeirut.posterous.com/